Wednesday, June 11, 2014

HSF14 Challenge #11 - The Politics of Fashion

It may seem a bit mundane, but for the Politics challenge, I decided to make a pair of pants.  I needed something simple between more complex projects, to be honest.  So I mentioned to my mother that I was thinking of making a pair of pants for this challenge, as women in trousers has been political throughout history.  Her reply made my decision for me: "Did you know that when Grandma showed up to college wearing pants, they sent her home?"  That really drove home how recently ladies in pants was an issue.  So pants it was.  

Some fun tidbits:

"[Katherine] Hepburn was an avid tennis player, swimmer, and golfer, and she chose to adopt menswear (that is, pants) to enjoy these activities. She carried this casual, cross-dressing style to the RKO studio lot where her pants were once stolen… until she threatened to walk around in her underwear if the slacks were not returned."

"In England during WWII, many women actually wore their husbands’ civilian clothes to work in and to save money. As the clothes wore out, pants made to fit women became increasingly popular so that by 1944 it was reported that five times more women’s trousers were sold than in 1943."  [x]


"It was not until they were essential to war-time efforts and jobs that most of society deemed them acceptable, and even then, preferred them worn only at work."  [x]

Another aspect I wanted to include was fabric rationing.  I found some charts and lists of things that were rationed during the war.  Wool was a rationed fabric, and could only be 9 oz weight or less.  I found a lovely grey wool that is so lightweight that you'd think it was cotton.  I bought three yards, but only ended up needing about a yard and a half.  I couldn't find a manufacturing limit on trousers, except that they couldn't have cuffs.  Mine do not.  But some manufacturers were limited to 2 yards for a dress, so I was well under that condition.  And skirts couldn't have a waistband wider than three inches.  Mine is about an inch and a half.  The wool is so light it's actually a tiny bit sheer, so I thought I would need a lining at first.  However, after putting together a cotton lining, I didn't care for the way the pants hung. They looked kind of blocky and stiff.  And in the spirit of rationing, it was probably defeating the purpose.  So I took out the lining and they look much better that way. 

I don't have many photos of my process, as this was a pretty simply project.  I made only slight alterations to the pattern, taking up the rise a bit, taking it in in the back, and giving myself a little more room in the hip.  I really thought this would be my first attempt at a bound buttonhole, but I didn't have any buttons I liked well enough for the outside, and I didn't feel like buying anything else.  So I put  in a couple of hook and bar closures, plus a button on the inside to keep it completely closed.


Taking up the rise a bit
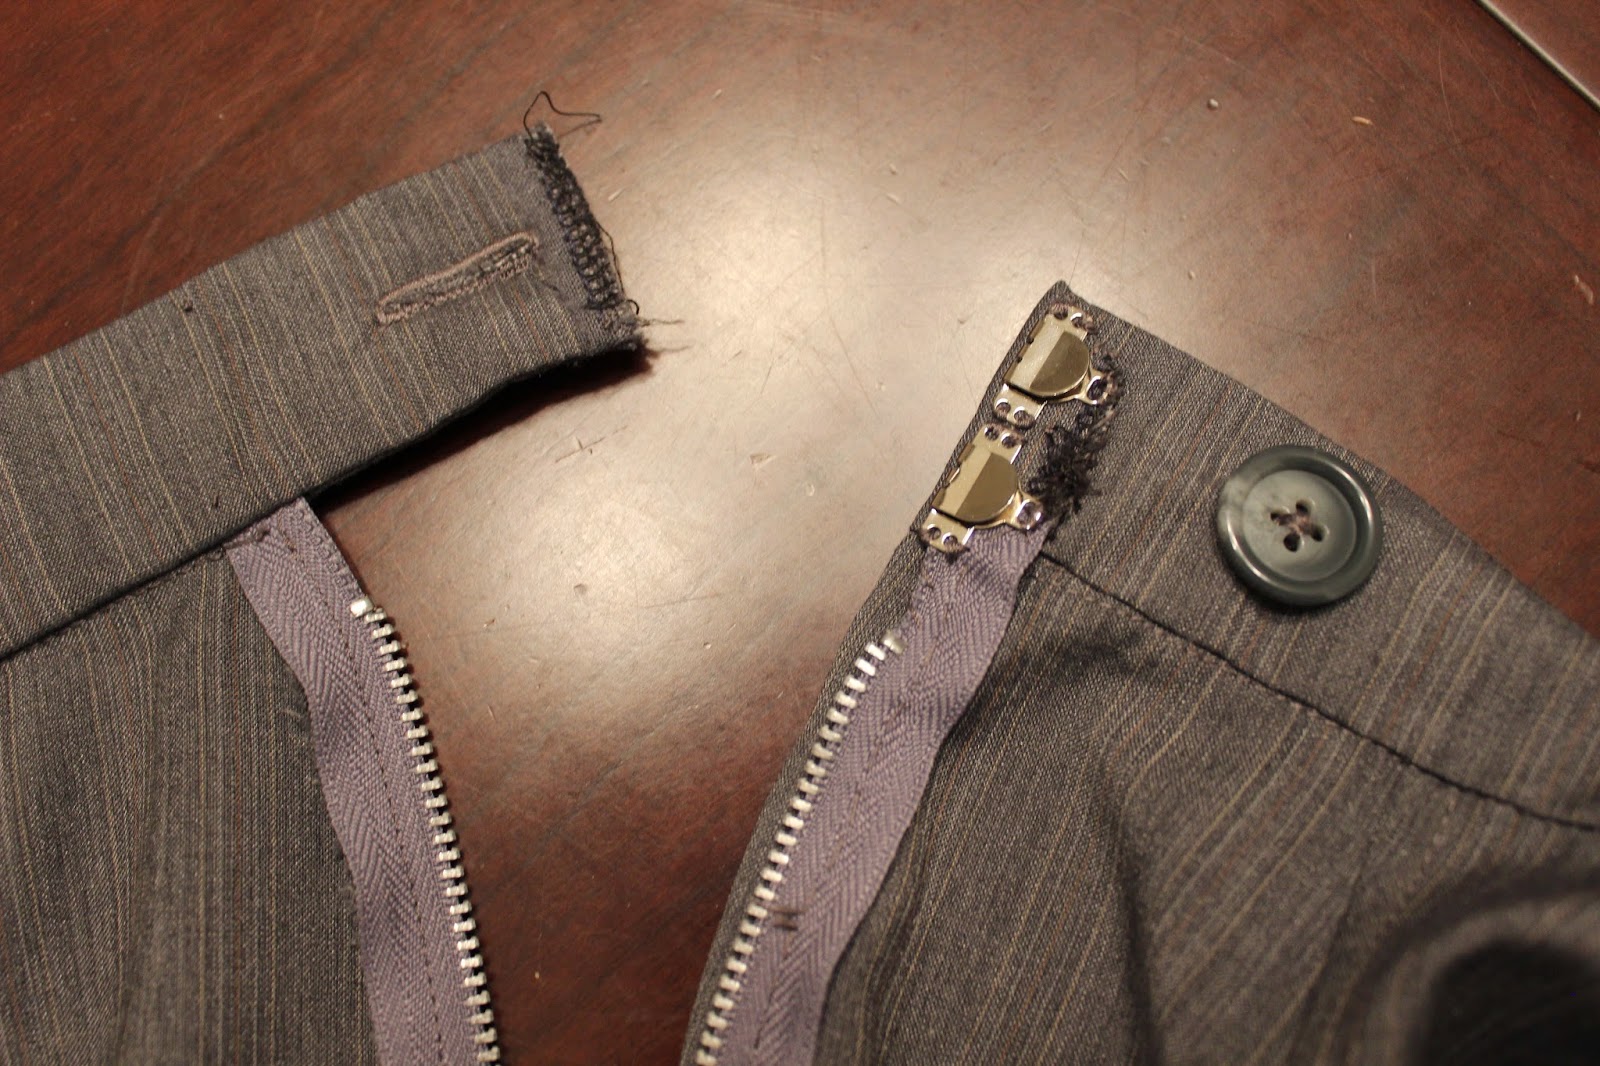

Metal zipper and closures, from the inside


My (mostly) handsewn lapped zipper, plus a good shoot of the delicate pinstripe on the fabric.


The Challenge: Politics

Fabric: 100% wool
Pattern:  Simplicity 3688
Year: 1941
Notions: Metal zipper, hooks and bars, plastic button
How historically accurate is it? The pattern is a Simplicity Reproduction of a 1941 pattern, which I (unusually) followed very faithfully.  The materials are all period appropriate as well (for a change).  The seam allowances on the inside are serged though. 
Hours to complete: 4-6 if you subtract the wasted time I spent on the lining I didn't use.
First worn: Not yet, except to model.  
Total cost: About $20, without the lining material

And the final product:


Guest starring my Husband's cute umbrella.


Cause it was a bit rainy.
The back


I'm excited cause there's an alligator and a Roseate Spoonbill in the lake behind me.  

Sunday, June 1, 2014

HSF14 Challenge #10 - Art

This was one of the harder challenges for me when it came to deciding on a project.  I kept going back and forth between what I thought would be simple and would work with costumes I already had, or really trying something I'd always wanted to do.  In the end, my ambition won out over my fear of time limits.

I've always loved the art of John William Waterhouse, an artist in the late 19th/early 20th century.  He's known for his romantic imagery of iconic figures from ancient mythologies, Arthurian Legend, and Shakespeare.  I had never made anything earlier than Renaissance era garments, so it would be a definite challenge for me.  My first plan was to try to mimic his 1910 Ophelia:

File:Ophelia 1910.jpg

I bought a white linen/rayon blend with the intention of dying it, as the store colors were limited.  (100% linen was too pricey, and the colors even more limited.)  I picked up some dye and got busy:


Only I can't find my stir stick!  And the water's too hot to use my hands!  I wonder if I have anything on hand...

Seems appropriate.

Alas, the color came out considerably darker than I planned.  But no matter, Waterhouse's 1916 Miranda has a similar silhouette in a much darker color:

File:Miranda - The Tempest JWW.jpg

However, after washing and pressing, the fabric showed something worse than a darker-than-expected color:

For some reason, it had splotched (a technical term, I'm sure) all over, and would look dreadful as a dress.  My options at this point were: try and dye it even darker to cover the blemishes, or buy new fabric and use the blue as lining.  Since I still need lining, I decided to go with option B.  After all, if a second dye job failed, I'd have to buy more anyway.  So back to the store and thankfully the fabric was still on sale.  The best option for a color to match the blue well turned out to be brown.  Fortunately, I'm excessively fond of brown.  However, I was glum about it no longer looking like the paintings...until I ran across his 1900 painting called The Lady Clare:
File:The Lady Clare.jpg

I took a little bit from all three in the end, using the color and bodice style from The Lady Clare, the darker blue from Miranda, and the sleeve style from Miranda and Ophelia.  I followed the directions from the Cotte Simple to build the main dress.  Her directions were easy to follow, and I highly recommend cottesimple.com to anyone looking to do a fitted 14th century dress.  The bell sleeves I adapted from Simplicity 1487, and the undersleeves were self drafted.


I draped initially on my dress form, and basted all but the front seam in place.  Then I put it on and had a friend adjust the center front until it was suitably fitted.  

The bodice pattern after balancing.

The bell sleeve shape

The undersleeve, with self-facing.

Inside and outsides of the undersleeves.

GORES.  Making giant triangles was a much bigger headache than I expected.  http://zilredloh.com/2011/10/11/reinforcing-pencil-skirt-seams-setting-in-a-godet/ was a great help for setting them in just right.

The full length pieces for the dress, with the shorter lining pieces.  This is the point (which seems to happen with all my projects) where I get so focused on construction that I stop taking pictures until the whole thing is done, or close to it.

I thought this was a rather brilliant way to space my eyelets.  I emptied out the hole punch and used the punched bits to figure out the placement.  Then I marked each one with Sharpie, which bled through the paper and left a small spot right where each eyelet needed to go.  Had to turn off the air conditioning though.
While this wasn't the first time I've done hand-bound eyelets, it was certainly the most I've ever done.  And this project holds another first that I've always wanted to try:

Spiral lacing!  Although Husband didn't quite close me in the back, my more lace-experienced friends managed it.  I used Jen Thompson's fabulous guide to spiral lacing at http://www.festiveattyre.com/p/the-zen-of-spiral-lacing.html.
X-laced in front to match The Lady Clare

Finished product!

Why do I keep tilting my head like that?

The Challenge: Art

Fabric: Linen/rayon
Pattern:  Cottesimple.com, with a little help from Simplicity 1487, and additional hand drafting.
Year: 14th Century
Notions: Cotton cord
How historically accurate is it? The pattern and shape is accurate, but I machine sewed most everything, and serged my seam allowances.  The dress is bag lined, and there's rayon in the fiber content.  I'm pretty proud of the hand-stitched eyelets, and I did hand stitch a few other bits in the dress.
Hours to complete: I keep meaning to keep track but...not this time.  
First worn: Not yet, except to model.  
Total cost: About $60

Friday, May 16, 2014

HSF14 Challenge #9 - Black and White

So I got a little behind after faire season.  It requires some serious unwinding, so I spent more time vegging than I should have.  But although it's belated, I have (mostly) completed the Black and White Challenge.  A few years ago, I spotted some fantastic black and white fabric in the bargain section of my favorite fabric store.  I was unemployed at the time and reluctant to pick up fabric without a project in mind.  So I left it on the shelf.  A few months later, my mother (and fellow fabric hoarder) gave me six yards of it for my birthday.

Then about a year ago, a friend of mine decided she wanted to make a Victorian costume for Dragoncon 2013 and of course I was on board.  I dithered over various fabrics for weeks until I remembered the black and white stripe.  Originally I had planned to make a walking suit, but when I didn't care for the cut of the bodice, I cut it down to a dinner bodice.  Then I decided I didn't like the sleeves, and changed it to a ballgown bodice.  I was pretty happy with the final result.


I still had a good amount of the stripe and black shantung, so for the black and white challenge I decided to make a day bodice for the dress like I'd originally planned.  I used the two-tone cuirass bodice pattern from Period Patterns for Stage and Screen, and the sleeves came from the Truly Victorian 1880 jacket bodice.  I flatlined the fashion fabric with black duck canvas for support, and then bag lined with the black cotton.  I machine stitched the button holes as well.  There just wasn't enough time to do anything else.  I made covered buttons for the front of the bodice out of the striped fabric.

There's still a few pins where I need to tack the lining inside, and not all of the buttons are actually attached.  I also may go back and trim it more when I have time, but for now, here's what I have.  

It looks a little better on a person.


Covered buttons

Cuffs


The Challenge: Black and White

Fabric: Black poly shantung, black and white striped something, black cotton solid, black duck canvas
Pattern:  Period Patterns for Stage and Screen, Two-tone Cuirass Bodice.  Sleeves are Truly Victorian TV428.
Year: 1880's
Notions: Fabric covered buttons
How historically accurate is it? The outer fabrics are poly, and it is all machine sewing.  But I think the silhouette and patterns are pretty accurate.
Hours to complete: 8-10
First worn: Not yet.
Total cost: Under $25 - the main fabrics were leftovers from another project.

Thursday, May 1, 2014

HSF14 Challenge #8 - UFO and PHD

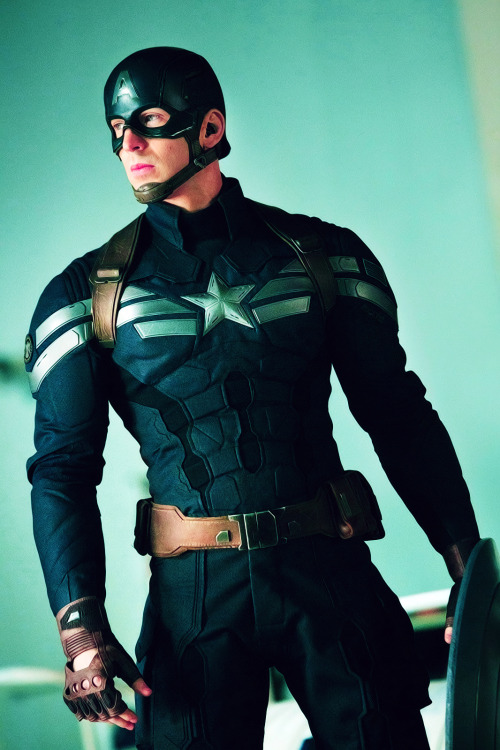
I am a bit of a geek (understatement) and one of my fandoms is the Marvel Cinematic Universe.  My girlfriends and I have been known to cosplay particular characters, and my choice is always the same.  My favorite MCU character is Captain America.  Last year, I decided to make an evening gown inspired by Cap 2: Winter Soldier.  Specifically this look:


I dithered about the design, but I had plenty of time before the movie premiered, right?  But as usual, my Ren Faire took over my life, and I never got started on it.  When I signed on to the HSF, I thought about re-interpreting the gown in a more historical way.  After all, the first Cap movie takes place largely during WWII.  Once I decided to go that route, I could see the design much more clearly. 

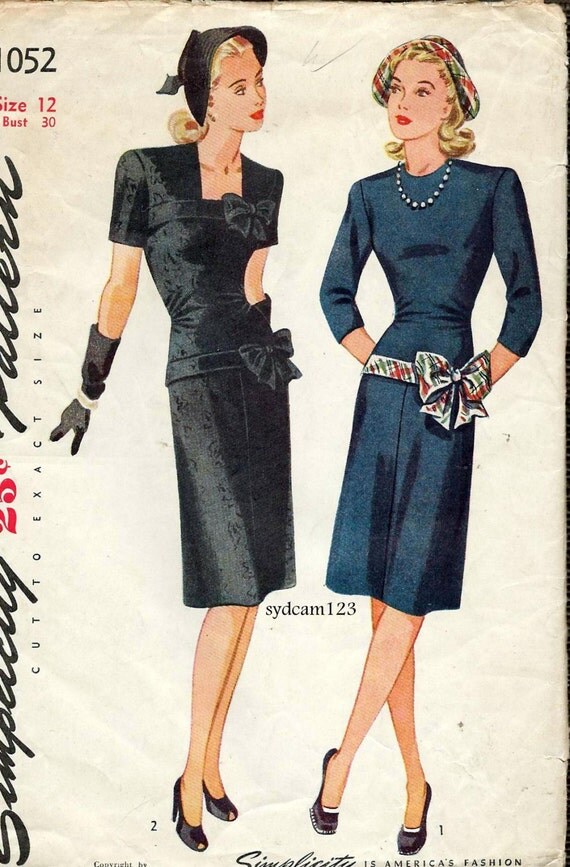
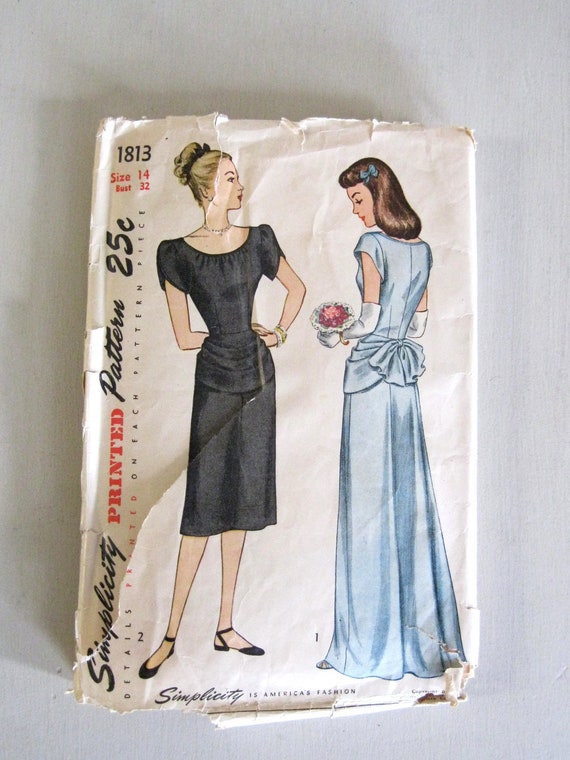
I selected Simplicity 1052, which had the fitted bodice and square shoulders that I wanted.  I also wanted to add the drapey front peplum that resembled the Victorian Bustle.  I referenced Simplicity 1813 and Simplicity 1637 for that style. 

Vintage 1945 Fitted Dress Bodice and Hip Bows...Sleeve Variations...Simplicity 1052 Bust 30
Simplicity 16371940s Evening Dress Pattern, Bust 32, Simplicity 1813, Bridesmaid Dress, Draped, Bustle, Petal Sleeves, Scoop Neck
Once I had mocked up 1052, I didn't care for the waist gathers, so I changed them to waist darts like in 1813.  I also changed the single bust dart to a double one, a feature from another forties pattern that I liked the look of. 

Waist gathers

Waist darts

Changing the single dart to doubles


I had intended to have short sleeves, but they just wouldn't lay in a way I was happy with.  So I added a slight cap and left it at that. 

For the drape, I used the front of my Truly Victorian Waterfall overskirt and extended it to go all the way around my waist.  Typically, these drapes were worn in the front.  But I was twisting it around to pin in place and really liked the way it looked on the side. 


The final touch was to add the Captain America accessories.  I made two stars out of Wonderflex, covered them in glitter, and added a rhinestone star in the middle for accent.  I backed them with extra fabric from the dress and pinned them in place.  The same technique was used for the wings in my hair to match Cap's helmet. 

Overall, I was pretty happy with the look of the dress.  If I did it again, I probably would use different fabric.  I adore the luster of peachskin, but it frays like nobody's business.  The darts are already showing wear where the stitches are, and I've only worn the dress once for any length of time. 

The Challenge: 
UFO or PHD
Fabric: Navy blue poly peachskin
Pattern:  Simplicity 1052, with some influence from Simplicity 1813
Year: Early 1940's
Notions: Wonderflex, glitter, glue, safety pins, blue invisible zipper (don't judge)
How historically accurate is it? It's made from a vintage 1944 pattern, with some alterations.   The invisible zipper is all wrong, but I have a preference for them.
Hours to complete: No idea
First worn: April 12th, for the Chess Match Cast Party.
Total cost: Probably 50ish


 And just for funsies...my first rendition of Cap (totally not my design - original here):
 Two of my best girls playing Thor (girlbydaylightcosplay.tumblr.com) and Loki (artandrhinos.com)

Saturday, April 12, 2014

HSF14 Challenge #7 - Toppers and Toes

After a brief break from my Renaissance projects, we now return to the 16th century...for the last time!  Yes, this is the last of the projects I created for both the HSF14 and Bay Area Renaissance Festival 2014 (and yes, we do call it BARF).  I wanted to do a hat I'd never done before.  Last year I made my first French hood, and I was really happy with it.  This year I decided to try an Italian Bonnet, which I'd seen patterns for on Lynn McMaster's page.  I didn't have time to order the actual pattern, so I decided to just kinda wing it.  I used sempstress.org for construction help.  Her hat making guides are invaluable.  

I like making my hat brims out of the uber-modern material Fosshape.  It feels like a heavy felt, but hardens up when heated.  I find it holds shape perfectly for a hat brim.  I didn't have any millinery wire, so I used a covered floral wire for the brim.  I've used it before and been happy with the results.  I was super down to the wire trying to get this finished for opening day, so the pictures of construction are limited.


The fosshape brim and crown pieces before covering

The covered brim 

I had been planning on making the crown grey as well, but for some reason it wasn't working for me.  So After rummaging through my stash, I found a large piece of poly velvet that looked rather nice when I pleated it down to the crown.  I machine stitched the pleats to the crown, and a piece of velvet ribbon to the brim to tie the two fabrics together.  Then I hand stitched the brim to the crown.  Then I pinned the feathers and a painted brooch to the crown to make it a bit fancier.


My friend Jen (artandrhinos.com) takes the best photos of me


The Challenge: Toppers and Toes
Fabric: Fosshape, grey cotton sateen, black poly velvet
Pattern:  Self-drafted
Year: Mid-1500's
Notions: Velvet ribbon, white ostrich feathers, floral wire, and a painted brooch
How historically accurate is it? It's patterned after an Italian bonnet, but has a lot of modern construction.  
Hours to complete: 4ish
First worn: Opening weekend, February 22nd!
Total cost: Hard to say, since I made it mostly from scraps I already had. 

Bonus Hat:  I made another one for a friend on cast, with a slightly different technique.  This time I pleated the sides of the crown, stitched it down, and then added the top of the hat.  I used more velvet ribbon to hide the stitches,  and he added a lovely cockade with feathers to bring it all together. Another slight difference: I tried making the crown wider at the top than at the base, something I forgot to do on mine.  Overall I was happy with both hats.

How on earth is it staying on his head? 


AND THAT'S IT!!!  No more Renaissance sewing for the rest of the year!  I can finally venture into other time periods, and make things that don't have to survive sun, rain, dirt, somersaults, and weaponry.  Thanks for bearing with me through my festival season.  Soon I'll post some pictures of what these garments look like after seven weekends of all this.