Monday, December 15, 2014

HSF14 Challenge #23 - Modern History

It's the time of the year for parties!  For Halloween I put my Poetry in Motion dress to use, and this past Saturday I took out the Art Challenge dress for a Durin's Day party.  This Saturday is the annual Christmas party hosted by one of my best friends.  Last year we all decided to make plaid dresses for the occasion.  It was so much fun we decided to do another theme this year.  We decided on candy and/or food themed dresses.  I decided to make my dress do double duty for the party and the HSF.

I had initially planned on using a fabric I'd spotted that had glittery Christmas donuts on it, but by the time I went back, it was all sold out.  So my mother and Husband voted for a black fabric with peppermint chevrons on it.


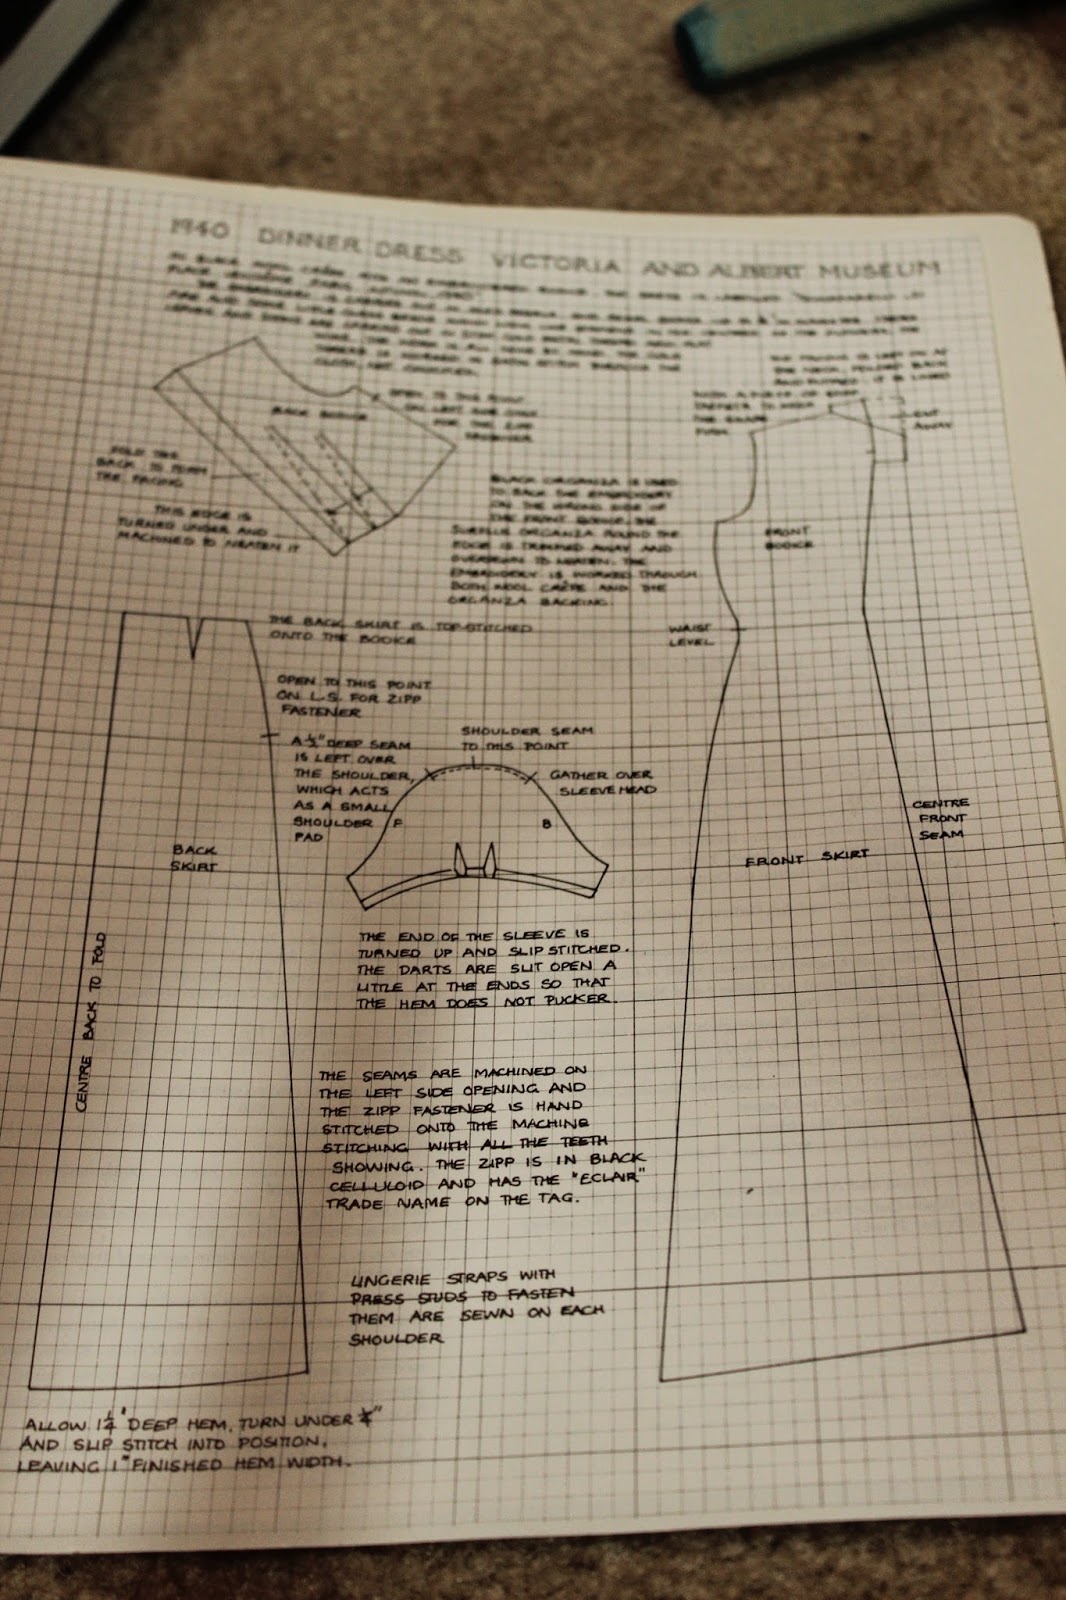
I dithered about patterns for awhile, because I was picturing something rather slim-skirted in my head, but non of my period patterns seemed right.  I tried a mock-up of a Janet Arnold pattern for this dress from 1938:


I  have no idea what I did wrong, but it was singularly unattractive.


What the heck is that collar doing?

So I pulled out my trusty 1940 Evening Gown from Vintage Pattern Lending Library and decided to go with that.  I had to take some of the volume out of the skirt, as I had only three yards of fabric, but I still managed to make it full length.  And as seen above, slimmer skirts were perfectly appropriate.

 
You can see how much slimmer I made it.

The last time I made this pattern up, I used the bodice only, so I had to make a full mockup to make sure it fit over my not-insignificant hips.  I almost started over during the mockup fitting, because I wasn't sure I liked it.


But I decided to keep going and almost everything went together smoothly after that.  Almost.  When I laid out the pattern to cut the peppermint fabric, I could not remotely get the pattern to match up on the seams.

I gave up and just cut the thing out anyway.


I wasn't too concerned about the side seams, but of course this dress had seams down the center front and back.  The best solution I could come up with was to cover the seam with some red ribbon.  The pattern still didn't match, but it looked a little less jarring.  A cute bow at the top, and voila, I'm a present!  Oh, and I inserted a lapped zipper, but this one would not lay flat, so I traded it out for an invisible one.

 
Not my best, but it will do.

Facing and straps


The Challenge: Modern History

Fabric: Quilting cotton


Pattern:  VPLL F3680
Year: 1940
Notions: 3/8 in red grosgrain, black invisible zipper
How historically accurate is it? The fabric is 100% cotton,and the pattern is period.  But there is a little serging on the inside, and the zipper is plastic.
Hours to complete: (Makes jazz hands and shuffles out of frame)
First worn: Should be this Saturday!
Total cost: $35ish

And the result:

Still looks a bit wonky

I'll live

Has a nice shape though

Evie decided to join me

Wednesday, December 3, 2014

HSF14 Challenge #22 - Fortnightlier's Choice: Gentlemen

For this challenge, I knew what I'd make as soon the challenge was announced.  In college, my design teacher had us size up and fit a pair of men's fall-front breeches.  It's one of my favorite patterns and I've made them for more than one show.  I have a show in May, right after my Ren Faire, that has significantly less stringent costume rules than the faire.  (I should know, I made most of the rules for both.)  The May show is for a Pirate Festival in Madeira Beach, FL.  Rather than being set in a specific time period (like the Bay Area Ren Fest, which is set in 154?) this show spans hundreds of years.  The idea is essentially that pirates from all eras have come forward to OUR time to search for a legendary treasure.  This way we can have Grace O'Malley rubbing elbows with Jean Lafitte.  We also have a group of fancy harlots who get to lounge around drinking wine and flirting with the pirates (best role ever!).  I play a French Harlot, and I have done her costumes in both the late 18th and early 19th centuries.  Having done some damage to my costume last year, I needed to make some new pieces for it.  Fall-front breeches would be a fun look I haven't done in awhile.


I picked up some upholstery fabric that looked a bit like dupioni and some great flower-shaped buttons, all I really needed for this project.  I then realized I didn't have enough buttons and had to exchange them for something I could get more of.  Oops.


I still had an old mock-up of the pattern, and it still fit.  So I just dove right into cutting and sewing.  I did the majority of it in one day.  When I went to sew my buttonholes, I planned to do the expedient thing and make them on the machine.  Well this fabric was NOT having it.  So I had to learn how to do hand-stitched buttonholes for the first time.  They took an embarrassingly long time, but I'm very happy with the way they turned out.  I used pearl cotton thread and this fantastic how-to.


 The rest of the pants I'm pretty pleased with, although they are a smidge tight.  If I did them again, I would build plackets into the knees so they could be opened up and buttoned back down.  I might still open up the side seams before next May and at least give myself a bit more bending movement.


The Challenge: Fortnightlier's Choice: Gentlemen


Fabric: Upholstery fabric, cotton/poly blend
Pattern:  Something my design teacher gave me approximately a million years ago
Year: Late 18th century
Notions: BUTTONS
How historically accurate is it? I believe the original pattern was a period pattern, but of course I'm using a machine, and a serger because the fabric unraveled if you breathed on it.  The buttons are metal at least, and the buttonholes hand-stitched
Hours to complete: Most of a Saturday, and interminable age for the buttonholes.
First worn: Just to model, although they will definitely get some use next May.
Total cost: $45ish

And the result:


Underflap

Fall-front

Modeled with my first Georgian corset, an old chemise, and a quick-and-dirty pomp.

From the back 


A better shot of the fall-front


One of our next door neighbors stopped by to say hi.

Monday, November 17, 2014

HSF14 Challenge #21 - Redo

From the beginning of the HSF14, I had a plan for Redo.  For the very first challenge, Make Do and Mend, I wanted to do a Make Do.  I'd purchased a curtain from a thrift store that would be perfect for it.  But it was at the start of my faire season, and time was against me, so I just did a quick mend of one of my faire gowns I wasn't using.  Good thing too, since I've had to pull it out twice since then.  But I still wanted to make something with my curtain, so I decided that unless I missed another challenge, when Redo came around, I would do the Make Do part of Make Do and Mend.  Well I've fortunate enough to have managed every challenge. The only one I have truly disliked was Paisley and Plaid, however my Poetry in Motion gown was also paisley, which more than made up for it.  So the Make Do Redo was on!

While my choice of garment was very simple, I'm pretty happy with the result.  Once again I have to apologize for the lack of progress pictures, but I promise there was nothing terribly interesting about it.  I picked a 1943 skirt pattern, since the war years seemed appropriate for Making Do.  The curtain I bought is a very lightweight cotton, and has nice linear texture pattern.


It was a bit sheer, so I lined it with muslin.  The pattern required very little adjustment, so I was able to use the mock-up as the lining.  I intended to bag line it, but I couldn't quite figure out how to put a lapped zipper into it.  So it became sort of half and half.  It was mostly bag lined, except for the zipper seam, and the lining was folded up with the hem.  It gave the skirt a nice weight and a little stiffness, like there was horsehair in the hem.


I've always been the sort of person who used and abused shortcuts.  In theatre, it only has to look good on the outside, and from several feet away, even in small venues.  But somewhere along the way I've become much more particular.  I've become the sort of person who cannot resist hand picking a zipper.  When did that happen?  However it did, this is definitely one of the best ones I've put in.  I was positively giddy when I saw how flat it laid.  I also handstitched the entire hem, because I didn't want a big machine stitched line across the bottom.


The Challenge: Redo/Make Do and Mend

Fabric: Cotton curtain, muslin
Pattern:  McCall's 5189
Year: 1943
Notions: Plastic zipper, hooks and bars
How historically accurate is it? 60/40?  It's from a vintage pattern, and the fabric is the right material, but I did serge my seam allowances and used a plastic zipper.

Hours to complete: Eh...
First worn: Just to model
Total cost: $15 at most. 

And the result:  


Friday, October 31, 2014

HSF14 Challenge #20 - Alternative Universe

I picked up a commission a few weeks ago for one of my friends who does another Renaissance Festival in the fall.  He wanted a garment he could wear over or under his regular doublet that would have sleeves for when in what chilly.  The basic design he wanted was: like a doublet, but shorter, no collar or flanges, and with buckles down the front.  While not particularly historically accurate, he's the client, so he gets what he wants.  Plus it makes a great entry for Alternative Universe.

I apologize for the complete lack of progress shots.  It was mostly from Simplicity 4059, with the length shortened and the sleeves a slightly different shape.  I used basic cotton twill for the outside and quilting cotton for the lining.  It went together very easily, and I brought it in for him to try on, just in case.  Good thing I did, as he said the sleeves were shorter than he'd like.  I didn't have much fabric left, so I added cuffs, that could be rolled to give anywhere from no addition at all, to an extra three inches in length.  I brought that back in and delivered it minus buckles for him to wear to rehearsal and make sure everything else worked.

It didn't.  Like me, he is a stage combat performer.   Although it fit fine when he was moving like anyone else, some of his fight moves were impeded by the jacket.  He needed a bit more room.  I took the jacket back and added gussets to the back of the shoulders to give him more range of movement.  And then I finally added the buckles, which I found at Tandy Leather.  That was a new thing for me, and it took a little finagling to figure out how to attach everything.

The Challenge: Alternative Universe

Fabric: Black cotton twill, black quilting cotton
Pattern:  Simplicity 4059
Year: Who knows...at this faire (not my home faire) most everyone is in Tudor/Elizabethan garb, but they have King James and Musketeers.  
Notions: Buckles
How historically accurate is it? It fits into this faire and this challenge perfectly, I'll say that. 

Hours to complete: Look!  A puppy!
First worn: This coming Saturday
Total cost: $40ish

And the result:


Yes, he wanted it that short.


The back

Close up of the buckles

The cuffs

Last-minute gussets

The jacket under his regular doublet

Very Alternative History

Saturday, October 18, 2014

HSF14 Challenge #19 - HSF Inspiration

I must admit that I was really lost on this one.  I think there were just too many options, and I poured over the boards again and again wondering what I should do.  Plus time was still an issue, and I'd picked up a commission in the last week that needed my attention.  (Fortunately, it will serve well for Alternative History.)  But on another review of the Art Challenge, I remembered how much I'd liked the recreated jewelry by Debbie Mac Rory, seen here. I used to make jewelry all the time before sewing took over my life.  I thought it would be fun do make some again, plus I could make something to go with my big gown project.

I searched through pages of Edwardian and 1910's jewelry to find something I wanted to recreate. A lot of it was the sort I had neither the budget nor the tools to make.  But I really took to some of the multi-stranded styles.

Edwardian Amethyst Festoon Necklace


With no decent beading stores nearby, I had to make do with what I found at Joann and Michaels.  I bought gold chain, spacers, jump rings, and some pretty gold pendants to assemble my necklace.

Those giant pearls weren't working for me though.  I popped them out with pliers.

It only had four rings on the back and I needed six, so I added spacers to the back to give me an extra ring.


This piece had an open lattice design, so I just looped the extra rings through it.

I couldn't find stones in the colors I wanted, so I created an enamel effect by painting the centers with gel nail polish and then finished with Modge Podge Dimensional effects.  I'm pretty happy with the way it turned out, although when my gown is done, I will probably adjust the length, and possibly tweek the color a tiny bit.

The Challenge: HSF Inspiration

Fabric: None
Pattern:  None
Year: 1910's
Notions: Assorted jewelry findings
How historically accurate is it? The style looks right, but given that it was assemble with pieces from the local craft store, paints, and pliers, I can't really say much for the construction. 

Hours to complete: 3-4 hours because of the painting.
First worn: Not yet.
Total cost: $20-25ish?

And the result:

Came out a touch more purple than I wanted, but I can live with it.

I think I need to make the "stone" a bit higher, like a cabochon.